Team Members
Colin Blake, Electrical and Computer Engineering ’24
Hugh Gallagher, Electrical and Computer Engineering ’24
Eric Wenner, Electrical and Computer Engineering ’24
Mentors
Jack Mottley, Daniel Phinney, Tre DiPassio
Project Description
The goal of this project is to accurately characterize which (if any) surfaces in a room create acoustic reflections. We achieve this by generating an impulse at the performer/speaker’s expected position and, using a series of microphones to understand which surfaces create reflections. Data acquisition, processing, and visualization features are constructed in order to provide a turn-key system for an operator.
1. Overview
The overall goal of this device is to provide the ability for an operator to understand which surfaces in a large hall produce sound reflections. This is useful for determining how to improve the overall acoustic properties of the room, by understanding which surfaces in the room may require damping.
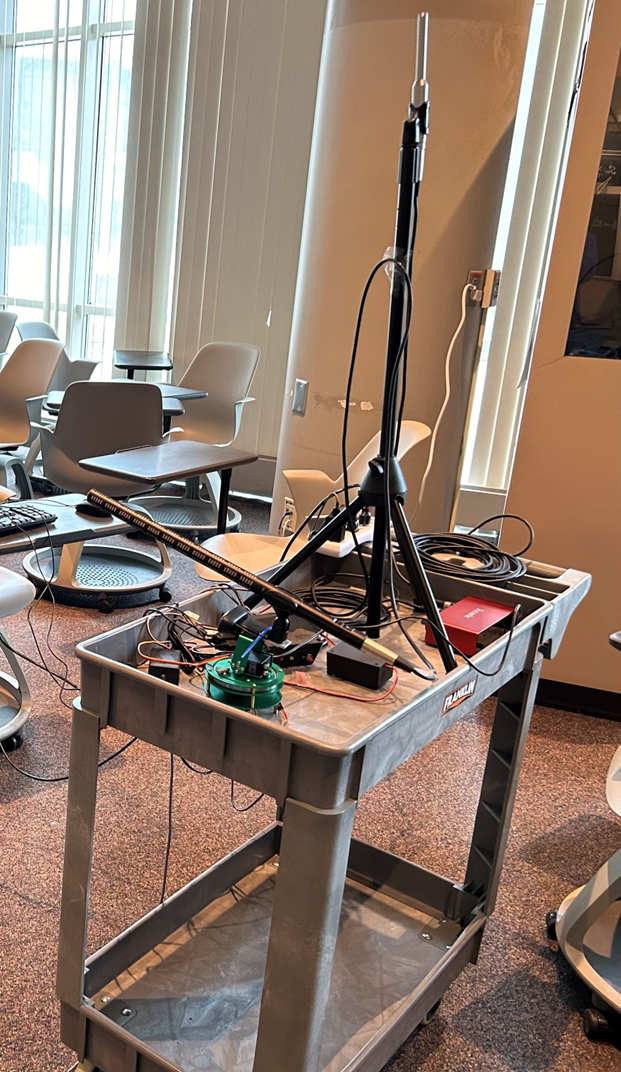
The system works by producing an acoustic pulse which will propagate through the room and reflect off of some surfaces, but not others. An omnidirectional microphone is used to understand the room’s overall response to this pulse, and a directional microphone is swept through a range of angles in order to understand how strongly the pulse reflects off of each individual surface in the room. A camera image is taken along with each directional microphone trace so that the operator can understand which surface in the room corresponds with each directional microphone trace. These data are packaged into a set of images which the operator can look through after the conclusion of testing, without the need for specialized analysis tools or software.
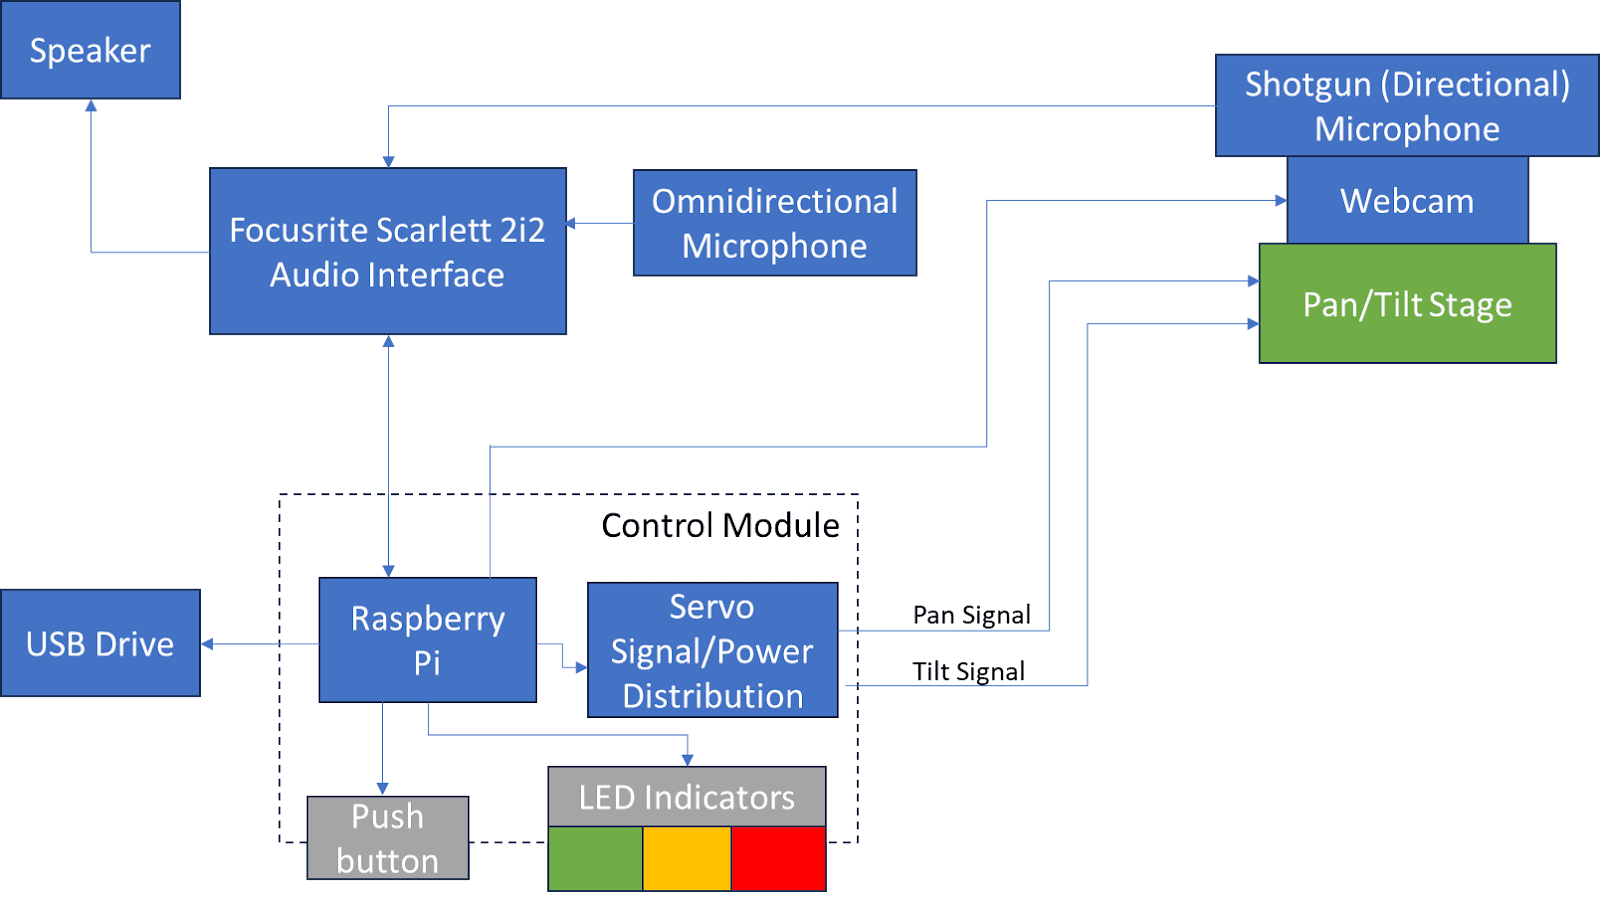
Figure 1: System Block Diagram
2. Setup
Speaker and Microphone Placement
There are two options for placing the speaker and microphone components of this system within the room of interest. The first option is to place the speaker component near to where the lecturer or performer would be within the room, and to place the microphone component at a central point within the space that would be occupied by the audience. This approach would likely provide the most relevant reflection data, as it most closely replicates the conditions that a real audience would experience. This should be the first approach taken when attempting to characterize a room.
In some rooms a different approach may be beneficial. If the main potential reflectors in a room are very near to the lecturer’s position (e.g. a large whiteboard in a lecture hall), then placing a speaker near the lecturer’s position would yield a reflection with very little time-delay compared to the original signal, making the reflection hard to resolve. This can be fixed by placing both the speaker and the microphone components far from the main potential reflectors in a room, such that the speaker pulse will have a significantly longer path length when reflected off the main potential reflector than the straight-shot path to the microphone component.
External Storage Device
An external storage device (i.e. USB flash drive) must be plugged into one of the USB ports on the Control Module. All data generated by the acoustic characterization system will be saved to this external drive.
3. Operation
Operation of the acoustic characterization system includes several distinct phases, each with its own considerations in order to ensure valid data collection.
Power Up & Initialization
Power up of the system is performed by flipping the switch on the cart’s power strip. This will cause the Raspberry Pi within the Control Module to begin booting, and will cause the pan/tilt servos to receive voltage. The red LED will flash on and off at least once during this process. The process could take up to one minute. Upon completion of initialization, the yellow LED will illuminate. During this phase, press the button on the Focusrite audio interface to enable 48V phantom power to the microphones. This is necessary in order to receive a usable signal.
Begin Data Acquisition
Once the yellow LED is illuminated, the user may press the button on the Control Module to begin the data acquisition sequence. Upon pressing the button, all three LEDs will flash on for one second, and then the yellow LED will remain on for the duration of data acquisition. The system will begin to deliver acoustic pulses, collect microphone data, and sweep the directional microphone through the range of pan and tilt angles.
Considerations During Data Acquisition
During data acquisition, operators should be mindful to not produce noise which could interfere with collected data. Operators should also be mindful of their position relative to the microphone and speaker components, ensuring that they do not block propagation of the sound wave.
Conclusion of Data Acquisition Sequence & Power Down
Upon completion of the data acquisition sequence, the green LED on the control module will illuminate. At this time, the device can be safely turned off (by flipping the switch on the cart’s power strip), and the external storage device (flash drive) containing the recorded data can be removed from the Control Module.
4. Data Analysis
Data from the acoustic characterizer system is presented as a series of images as shown in Figure 2. On the left hand side of the image is a positioning camera frame (1) used to show where the directional microphone is pointing for this data acquisition trial. On the right hand side are traces from the omnidirectional microphone (2) and the directional microphone (3).
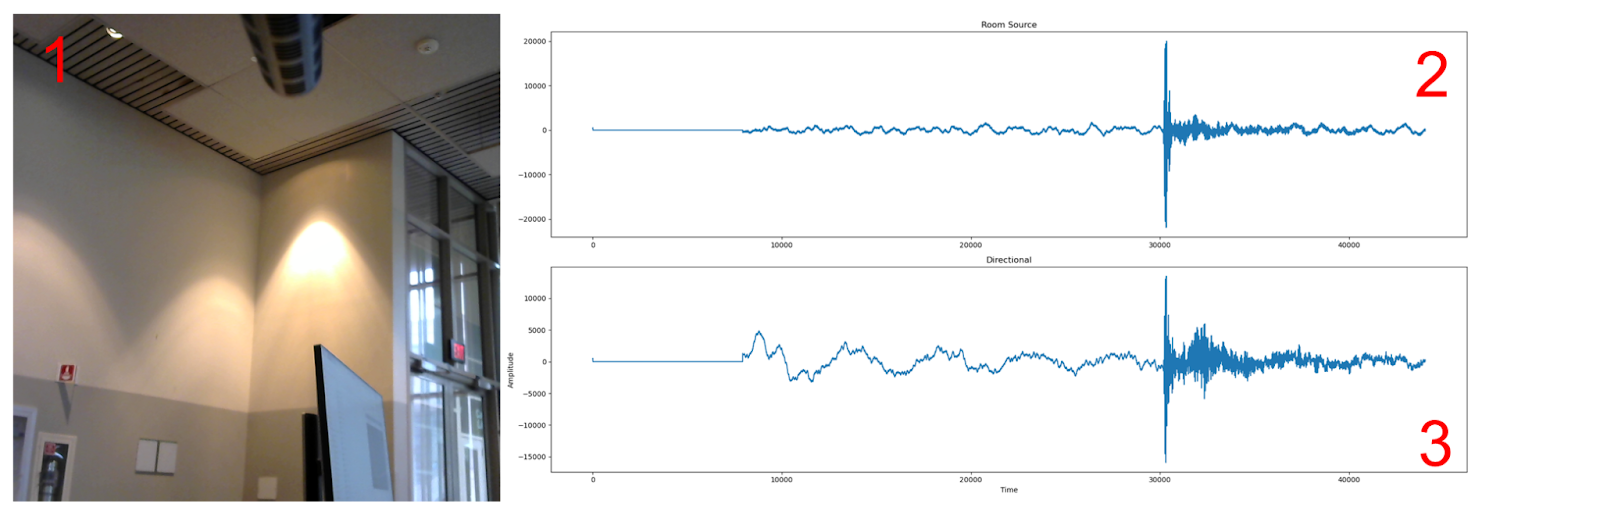
FIgure 2: Sample Data
It can be seen in Figure 2 that the directional microphone has detected a mild reflection seen in the 3rd window, as pointed out by the red arrow.
Acknowledgements
The team would like to thank Prof. Tre DiPassio and Prof. Sarah Smith for their guidance and advice in design, implementation, and troubleshooting of this project. The team would also like to thank their advisors, Prof. Jack Mottley and Prof. Daniel Phinney.